
![]()
- (NOTE: Am closing down my old Linux Newbie – since 1996 WordPress.com blog (is Private now), and am in the process of refreshing and moving some of the content over to my self-hosted KM&T (Karmi’s Musings & Tech) blog here.)
This series is mainly for potential Windows users. In Part 1 I mentioned two options for installing Porteus v5.0 onto a USB: 1) using a fat32 formatted partition. 2) using two partitions – a smaller fat32 formatted partition plus an ext4 formatted partition.
As most Windows users know, formatting a USB drive is limited to a size of just 32 GBs max when using fat32, which is why fat32 formatting is generally found on the smaller USBs.
In this ‘Refresh‘ of the original Part 2 in this Porteus 5.0 Cinnamon series, I am going to cover three Steps in creating various versions of the Porteus 5.0 Cinnamon OS – a ‘Live‘ version which will be used to create the other two versions (or Steps).
Porteus Linux works great on a 32 GB USB…heck, the updated Porteus-CINNAMON-v5.0-x86_64.iso I downloaded was just 359 MBs…1 MB smaller than the 360 MB one I got a few days before.
No *BLOAT* on Porteus Linux! I’ve recently tested it on a 16 GB USB w/ no problems ‘n plenty of room. I even formatted that 16 GB USB w/ Two Partitions – a fat32 plus ext4 partitions.
Both NTFS & Ext4 formats are a lot faster than Fat32. NTFS & Ext4 formats can also work on bigger SSD & NVMe drives.
In Linux, fat32 partitions are mainly for EFI/UEFI bootable partitions.
Here is the Official Porteus Installation Guide, which I have stopped using, but had found it useful back when I first started testing Porteus. Their Forum is probably the best source for quick and helpful information. The actual Porteus Home page seems to run behind its Forum, but there is also helpful info, info about, pics, links, etc. there.
Username for root is root and password is toor. User name for guest is guest and password is guest.
Step 1: Porteus 5.0 ‘Live‘ Fat32 USB
Porteus ‘Live‘ on a fat32 USB will be used to create the other two Steps in this post. Part 1 of this series showed how to create it on a USB that is 32GBs or less.
Not a lot of tweaking of the Porteus ‘Live‘ version in this Step. Open the downloaded file, and copy those files onto the USB:

…then:
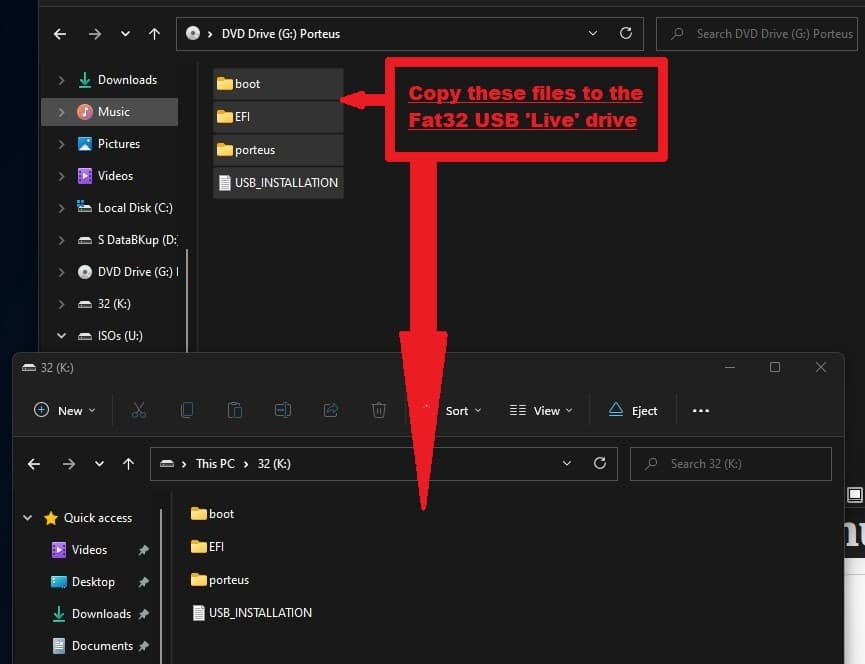
That’s it for the ‘Live‘ version.
Step 2: Porteus 5.0 on a Fat32 & Ext4 USB
Using the new fat32 ‘Live‘ Porteus 5.0 USB, plus its GParted app, we’re going to prep a 128 GB SanDisk Ultra Fit USB Target drive. You could use a SSD or different size USB as your Target drive, but make sure that the fat32 partition is around 350-360 MBs…that’s my recommendation and not the Official Porteus guide (not sure what theirs is?). Make the rest ext4. Like this:

Now we’re going to open the new fat32 ‘Live‘ Porteus 5.0 USB. Then in new windows, we’re going to open the new 377 MB fat32 partition & the new 123 GB ext4 partition of the 128 GB SanDisk Ultra Fit USB we just prepped. Like this:
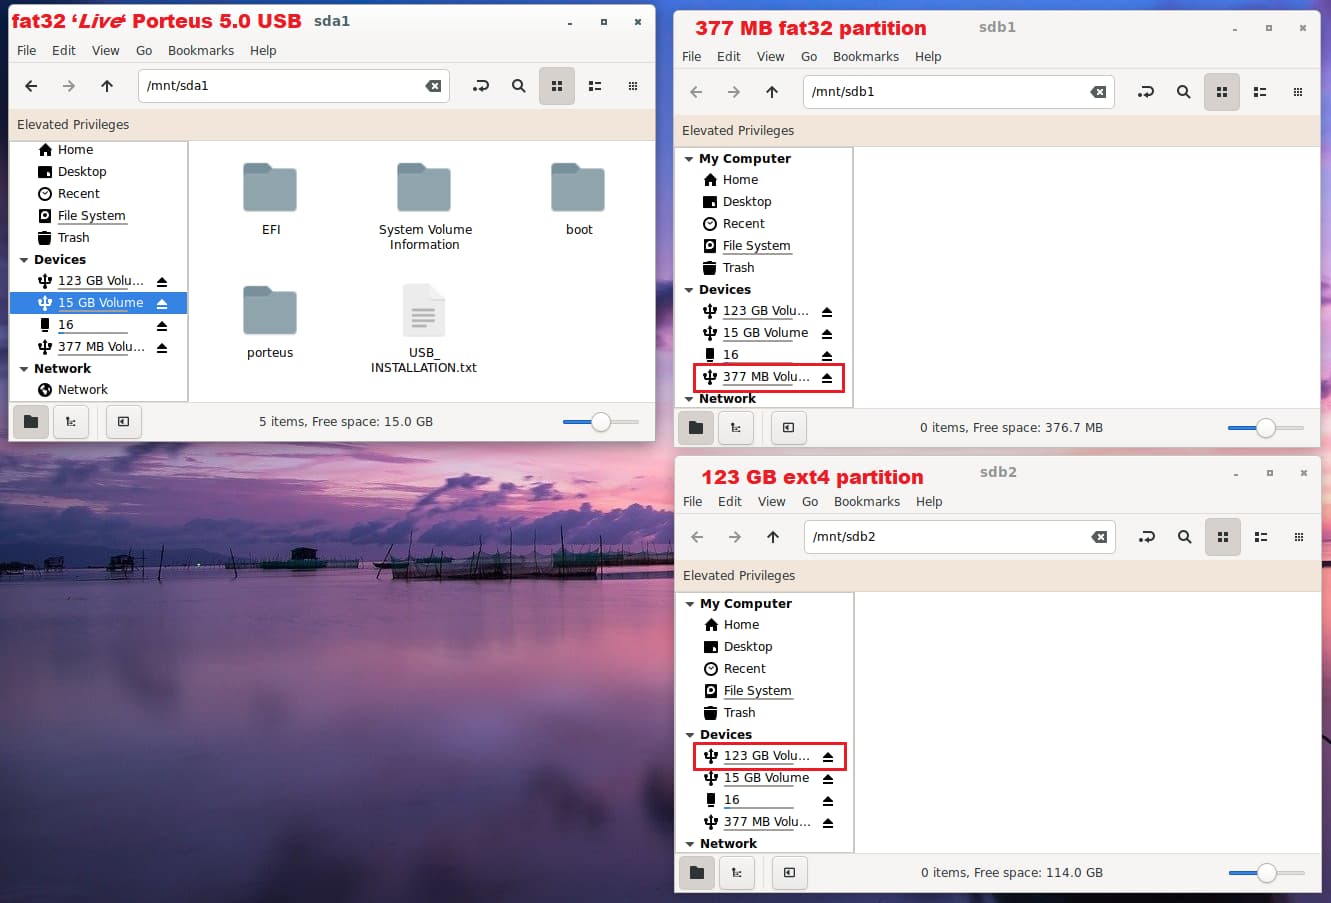
We’re going to be copying and/or dragging ‘n dropping some important folders, so I try to get the windows set up for easy moving.
Next, we’re going copy and/or drag ‘n drop the EFI & boot folders from the fat32 ‘Live‘ Porteus 5.0 USB to the 377 MB fat32 partition we just created on the Target 128 GB USB. Then, we’re going to copy and/or drag ‘n drop the porteus folder from the fat32 ‘Live‘ Porteus 5.0 USB to the 123 GB ext4 partition we just created on the Target 128 GB USB. Like this:

That’s it…we have now created a final installation of Porteus 5.0 on our Target drive, by using the EFI, boot, and porteus folders that were located on the fat32 ‘Live‘ Porteus 5.0 USB.
Porteus is extremely flexible for a Linux OS. 👍👌🙂👏
At this point, I shutdown the fat32 ‘Live‘ Porteus 5.0 USB, and get ready to try the new Porteus 5.0 installation on Fat32 & Ext4 partitions.
Step 3: Porteus 5.0 on a Fat32 USB
Refer to the Official Porteus Installation Guide if needed.
For Step 3 we will use the same ‘Live‘ USB created earlier, but will add a Saved.dat file that will save the settings, changes, etc. made when using Porteus on a fat32 partition.
When booting into a newly installed fat32 Porteus OS you will see this – ‘Changes are not saved‘:

Porteus doesn’t automatically save sessions, settings, etc. in the fat32 format so you need to create a savefile.dat container.
Porteus SaveFile Manager:

The Porteus SaveFile Manager is under System. Open it and you get this:

We want to create a new savefile…click it.

Name, size, and location (‘Live‘ USB) – I made the size @ 6000 Mb, but since I never liked this method, am not sure what the best size is. 🤔
Hit OK:
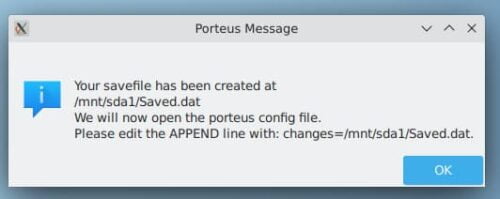
In case it doesn’t open or you missed what it was saying – The “porteus config file” is located at – Files > boot > syslinux > porteus.cfg:

I have found it easier to just create a fat32 + ext4 partitions, IMHO. That savefile.dat container doesn’t need to be created if you are using an ext4 partition.
I mainly use the ‘Live‘ fat32 method in order to use its GParted to partition a larger target drive w/ the fat32 + ext4 partition method.
…to be continued.