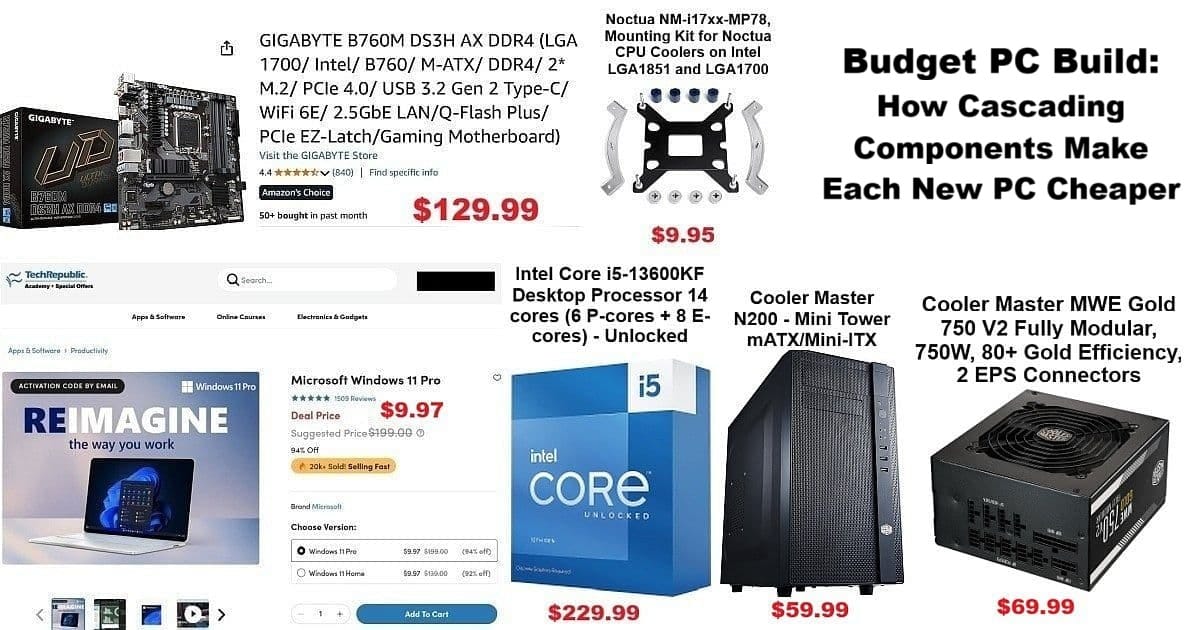
Dell 27 Plus 4K Monitor (S2725QS) – Cataracts and Eyeglasses

I recently purchased the Dell S2725QS 27-inch 4K Monitor for $279.99 + $19.60 tax, totaling $299.59. After years of using 20-22 inch monitors, I was concerned a 27-inch display might feel too large. However, its dimensions—24.08 in. wide (611.54 mm) and 14.02 in. tall (355.98 mm)—only add a few inches in width and height, fitting comfortably on my desk. Mounted on a swivel arm, it sits farther back than my previous monitors, freeing up valuable desk space. Plus, it came with free, fast shipping—ordered on May 18 and delivered by May 21!🙂👍

Cataracts and Eyeglasses

Underwent cataract surgery on both eyes—right eye in February and left in March. Adjusting to the improved vision took time, as colors, especially whites, became strikingly vivid. As a hermit, finding transportation and someone to wait in the lobby during each procedure was challenging. After three years of searching, I secured help, paying $240 per surgery for a driver to meet me in Gainesville, FL, and then take me to a clinic across the street and wait.

To celebrate completing my cataract surgery, I searched for high-quality eyeglass frames, moving beyond the $9-12 Walmart frames I’d used for 13 years. After receiving my new prescription in April, I chose four pairs—two from Warby Parker and two from Walmart—to suit my improved vision.

Read more

ASUS Prime Z790M-PLUS D4 mATX MoBo: Restore an Image and/or do a Clean Install

The Intel® Rapid Storage Technology (Intel® RST) driver holds the controllers (?) and storage drivers I needed to do a Backup and Restore (Windows 7) of a Win11 Pro saved image, and/or to do a clean installation of Win11 Pro – on an ASUS Prime Z790M-PLUS D4 MoBo.

I am no expert at motherboards, but I sometimes do more ‘Tinkering’ with my main computer (‘Apevia’) than I should—hence the reason for using the Backup and Restore (Windows 7) utility that comes with Windows 11 before actual ‘Tinkering’ starts.

Long story, but I don’t really want to go thru the ‘Nightmare’, in great detail, again. Doubtful that I could remember all the details anyway, since a lot of the experience involved luck, searching, banging away, more searching, more banging away mixed in with deep thought & pondering, experimenting & testing, and a stroke of good luck in the home stretch. 👍😳👌🙂

Read more

Fedora 39 Cinnamon SPIN – Anaconda (installer) + NVIDIA + System Upgrade

Fedora 39 Cinnamon SPIN keeps getting faster & smoother with each release! I go with the Cinnamon SPIN because it is about as close to a Windows ‘Feel’ that the Linux desktop can get.

I’ve got at least 17 pics to insert, plus about 11 more that are linked to, and those are mostly on how to use the Anaconda (installer).

Also want to squeeze in how to add a NVIDIA driver, and a glimpse at adding other apps with the Fedora GUI Software Management – dnfdragora.

Then, doing a quick review of how to do a System Upgrade from Fedora 38 Cinnamon SPIN to Fedora 39 Cinnamon SPIN. That involves upgrading a converted 12.2” Samsung Chromebook Plus V2 XE521QAB from 38 to 39.

Lots to do, so let’s get started! 🙂👏

Read more

ASUS Prime Z790M-PLUS D4 mATX MoBo – BIOS & Drivers

I have found that finding the right ASUS Z790M PLUS D4 drivers can be frustrating for this one. Since 2005/2006 I have purchased $60-$90 motherboards for my builds, but decided to ‘splurge’ on the ASUS Prime Z790M-PLUS D4 mATX MoBo – $171.89 + $12.03 Tax = $183.92.

Requirements were – Micro ATX, Intel Z790, LGA 1700, and 1Gb LAN motherboard. Have moved away from the big ATX & small ITX boards, and prefer the mATX boards and cases now—fact is, I was going to be removing (intact) an older board from my favorite case, a APEVIA X-QPACK3 mATX case, and building a new Intel® Core™ i9-13900K system in it.

I didn’t find a huge mATX selection, and PCPartPicker only had TWO listed, and I went w/ the ASUS Prime Z790M-PLUS D4.

(*1/31/2024 UPDATE: new info in ASUS Prime Z790M-PLUS D4 mATX MoBo: Restore an Image and/or do a Clean Install post*)

Read more

Builds & Upgrades — Part 5 (FINAL – Before & After)

Finished up new Build yesterday ‘n have it setup in my primary desktop spot – posting this from it right now. 👌👍🙌😁

Here are: Part 1, Part 2, Part 3, and Part 4.

Before’ as in the intact MoBo I moved out of the Apevia X-Qpack3 case, and ‘After’ as in this new Build inside it now. I name most of my computers after the cases I use to build them, and I’ll update the new components in ‘Apevia’ soon.

Here is a closer look at the new benchmark results – from UserBenchmark:

Read more

Translate »