
Most WordPress users leave LiteSpeed Cache optimization on default settings, missing free speed improvements that can boost site performance by 20-40%. If you’re running a WordPress blog on hosting that supports LiteSpeed optimization (like Hostinger, ChemiCloud, or others), you’re sitting on a goldmine of free performance improvements. The LiteSpeed Cache plugin can dramatically speed up your WordPress site with just a few simple tweaks – no technical expertise required.
Why Most People Miss Out on Free Speed
Most WordPress users install the LiteSpeed Cache plugin and leave it on default “Essentials” settings. While this works, you’re missing out on significant performance gains that are completely free and safe to implement.
Step 1: Create a Backup First
Before making any changes to your WordPress site, always create a backup. This gives you a safety net if something goes wrong.
Quick backup options:
- Hostinger users: Use the built-in backup tool in hPanel
- cPanel users: Look for backup options in your hosting control panel
- WordPress plugins: UpdraftPlus (free) or similar backup plugins
- Manual method: Download your files via FTP and export your database
Most hosting providers offer one-click backup tools that make this process simple.
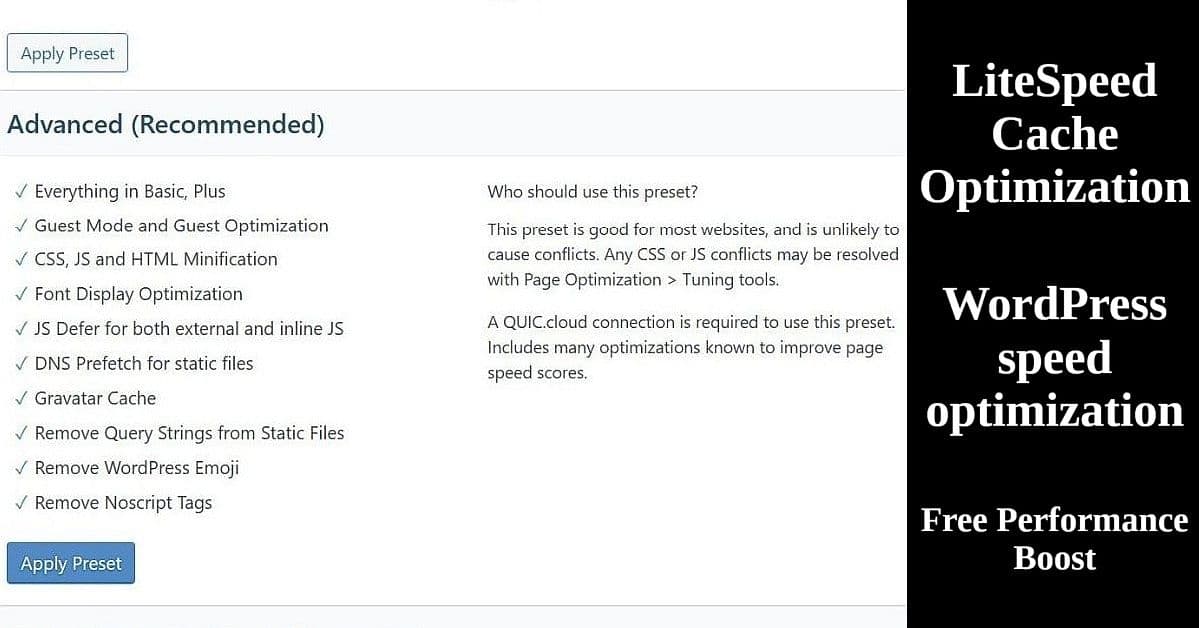
Step 2: The Easy Win – Upgrade to Advanced Preset
Once you have a backup, the single biggest improvement you can make takes 30 seconds:
- Go to LiteSpeed Cache > Presets in your WordPress dashboard
- Click “Apply Preset” next to “Advanced (Recommended)”
- That’s it!
This immediately enables:
- CSS and JavaScript minification
- Font optimization
- Image lazy loading preparation
- Mobile-specific caching
- DNS prefetching for faster resource loading
Safety note: The Advanced preset is designed to work with 99% of WordPress sites without breaking anything. If something does break, you can always revert back to Essentials.
Understanding QUIC.cloud (It’s Actually Free)
Here’s where many people get confused – QUIC.cloud integration. The good news: it’s completely free for typical blogs and small websites.
What You Get for Free:
- Unlimited CDN bandwidth through North American and European servers
- Image optimization with generous monthly quotas
- CSS/JS optimization
- WebP image conversion
For Small Blogs (Under 1000+ Visitors/Month):
You’ll likely never hit the free limits. The quotas reset monthly, and if you do exceed them, optimizations just pause until the next month – you’re never charged unexpectedly.
How to Enable QUIC.cloud:
Many users (especially on Hostinger) may already have anonymous QUIC.cloud access enabled by default. Check LiteSpeed Cache > QUIC.cloud Online Services to see your current status.
If you see “Link to QUIC.cloud” button:
- Click the blue “Link to QUIC.cloud” button
- Complete the free registration process
- This removes anonymous user limitations and enables full optimization features
Important: Registration is optional. You can stick with anonymous access if Page and Image Optimization are already working (shown with green checkmarks).
Advanced LiteSpeed Preset Settings for Maximum Performance
Once you’ve applied the Advanced preset, here are additional settings worth checking:
Cache Settings (LiteSpeed Cache > Cache):
- Enable Cache: ON (essential)
- Cache Mobile: ON (faster mobile experience)
- Cache Logged-in Users: Usually OFF unless you run a membership site
Page Optimization Tweaks:
Navigate to LiteSpeed Cache > Page Optimization and check these tabs:
CSS Settings:
- CSS Minify: Should be ON (removes extra spaces/code)
- CSS Combine: Start with OFF, test carefully if you enable it
JS Settings:
- JS Minify: Can enable, but test your site after
- JS Combine: Leave OFF initially (often causes issues)
Media Settings:
- Lazy Load Images: ON (images load as users scroll down)
- Font Display Optimization: Set to “Swap” for better loading
If You Don’t Use Comments:
Since many blogs disable comments, you can optimize further:
- Disable Gravatar: Go to Settings > Discussion and uncheck “Show Avatars”
- Skip comment-related cache purging in the Purge settings
LiteSpeed Image Optimization Made Simple
If you enabled QUIC.cloud, image optimization becomes automatic:
- Go to LiteSpeed Cache > Image Optimization
- Enable WebP support (modern, smaller image format)
- Enable Optimize Original Images if it’s off
Testing Your LiteSpeed Cache Optimization
After making changes:
- Clear your cache: LiteSpeed Cache > Purge > Purge All
- Test in incognito mode: This simulates how new visitors see your site
- Use the LSCache checker: Visit https://check.lscache.io and enter your URL
- Look for “LiteSpeed cache is a hit” – this confirms everything is working
What to Avoid as a Beginner
- Aggressive or Extreme presets: These require technical knowledge to troubleshoot
- Combining CSS/JS files: Often breaks themes and plugins
- Too many changes at once: Make one change, test, then move to the next
Quick Troubleshooting
If something breaks after making changes:
- Purge all cache first
- Disable the most recent change you made
- Test again
- For major issues: Revert to Essentials preset and start over
The Bottom Line
With just these simple changes, most WordPress blogs see:
- 20-40% faster page load times
- Better Google PageSpeed scores
- Improved user experience on mobile
- Reduced server resource usage
The best part? All of this costs nothing beyond the few minutes it takes to set up. Your hosting provider (if they support LiteSpeed) and QUIC.cloud handle the heavy lifting behind the scenes.
Before You Start: One Important Check
Make sure you’re actually running on LiteSpeed-compatible hosting. Popular hosts that support this include Hostinger, ChemiCloud, A2 Hosting, and many others. If you’re on basic shared hosting that doesn’t support LiteSpeed, these optimizations won’t work – but the plugin will tell you if there are compatibility issues.
Start with the Advanced preset, test your site thoroughly, then gradually explore the additional settings. Your visitors will thank you for the faster loading times!
Helpful Resources
External Links:
- LiteSpeed Cache Plugin – Official WordPress plugin page
- QUIC.cloud Free Plan – Details on free optimization services
- LSCache Checker Tool – Test if your cache is working
- Google PageSpeed Insights – Measure your speed improvements
Related Posts: